Showing posts with label AliciaMujica. Show all posts

Wednesday, December 8, 2021

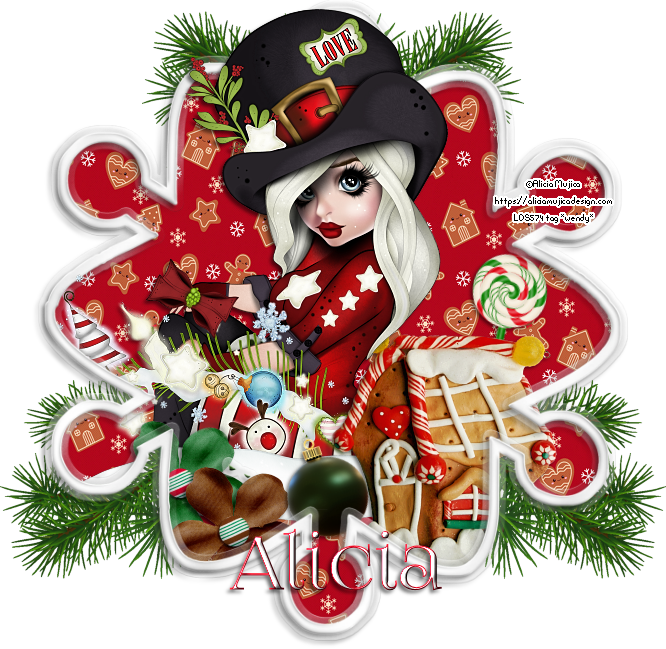
Snowflake Xmas

 In this quickie PSP tutorial I used the artwork of Alicia Mujica Designs
a tube included in the Black Friday Pack 2016
You must have a proper license for use of her images.
Freebie by Raspberry Roads called Gingerbread Christmas
available HERE. You do need to login to d/l this freebie.
Font for Name: Foglighten No.07

To sharpen elements, use Adjust sharpness ~ unsharp mask
setting: Radius 1, strength 55, clipping 1,
luminance only checked.

A drop shadow of choice


*~ Let's get started ~*


1.  Open element 15, r/s to 650 x 650 px, all layers checked.
Image Canvas ~ 700 x 700 px centered
Add a new raster layer, send to bottom of layers palette
Flood fill white.

Select snowflake layer, using magic wand: tolerance 10, feather 0,
 click inside center of snowflake frame
selection ~ modify expand by 12 px.
Add a new raster layer
move this new layer below snowflake
Open paper 1, copy & paste 'into' the selection. Deselect
Sharpen paper once.

2.  Open main tube. If using same, resize 25%
C/P above paper layer.
Should any of the tube layer extend beyond snowflake,
select paper layer, click with magic wand 'outside' of paper area
Select tube layer, erase any part of tube that extends beyond
except her hat & greenery.
Duplicate tube. Close duplicate copy for now.
Do not deselect.

3.  Add elements of choice, all placed below snowflake frame.
I added elem 24 ~ 35%
elem 11 ~ 20%
elem 12 ~ 20%
elem 21 ~ 10% use pick tool to rotate slightly left, sharpen
elem 22 ~ 10% Use pick tool to rotate slightly to right, sharpen
elem 25 ~ 25% C/P below paper layer to right of snowflake
duplicate, image mirror, duplicate again,
move this copy to top, just left of center, duplicate, mirror.
*see reference tag for placement if needed*

4.  Unhide duplicate copy of tube. Move to very top of layers palette.
Erase any portion of the tube that covers any of the elements below it.
For example:  gingerbread house, flowers, etc.
Add dropshadow to this tube layer only using 
dropshadow checked on 'new layer' option.**
This allows erasure of any undesired dropshadow.

**Adding a drop shadow on a new layer allows
you to adjust opacity, adjust direction and adjust colour too.**

Note:  When adding dropshadows to the elements, be sure
the shadow does not extend beyond the snowflake frame.
If a shadow does appear beyond frame, select
the paper layer and using magic wand, click outside this paper layer
to make a selection and then select element layer to erase any undesired dropshadow.
Deselect when done.

5. Add dropshadow to snowflake frame. 
I did not add a dropshadow to elem 25 (spruce tree branches)

6.  If you wish to resize tag, do so now
then add copyright, license, url & name.

Delete white background layer.
Merge visible, crop merged opaque
and save as a PNG.

Voila! I would love to see your result. :+)

*~* Merry Christmas *~*


Sunday, October 10, 2021

Put On The Hat


In this PSP tutorial I am using the adorable artwork of Alicia Mujica Design
This tube is called Cutest Witch of 2018.
You must have a license to use her artwork.
FTU blogtrain kit called 'Scare On' by Kathy's PSP Designs
♥ Thank you Kathy ♥
Word Art by myself found HERE
Mask_Viv_0038 (jpeg) & Mask_Vivienne-0088 (jpeg)

Font Blood Omen
Drop shadow of choice
**Add dropshadow as you go OR
after tag is complete**

*~ Let's get started ~*

We are working from the bottom upwards

1. Open new Image 700 x 700 px transparent
Flood fill white
Add a new raster layer - select all
Open Paper 3, Paste into the selection, d/s
Apply mask_Vivienne_0088. r/s 90%
Add new layer, select all
Open Paper 2, paste into the selection, d/s
Apply Mask _Viv_0038, r/s 90% & duplicate

2. Add elem 21
Add elem 04, R/S 75%
C/P, flip vertical, arrange
duplicate, mirror, flip vertical
Add elem 31, 50% place lower right, duplicate ~ R/S 75%
Elem 36 ~ 50% C/P to right, duplicate, mirror
Sharpen both

4. Add elem 43, R/S 50%, mirror
 C/P to left of tag. 
Back to original element 43, R/S 70%, mirror
C/P and rotate slightly using Pick tool.
Be sure to erase any part of these branches
that extend bottom of tag.
Add elem 2, 50%
Add elem 3, 50%
Add words of choice atop of book
I wrote Magic Spells in
font Blood Omen

5.  Add elem 14, 50% C/P to left
use Pick tool to rotate
Add elem 15, 75% C/P
duplicate this flower, R/S 85%, rotate ~ free rotate 40 deg to right, sharpen
Merge the two flowers down together
Duplicate, R/S 50%

6. Add tube of choice, R/S 35%
Add elem 34, R/S 50%
Add elem 46, 75%
Add elem 47, R/S to approx 145 x 139 px
Rotate to left with Pick tool,
sharpen.

7. Add wordart provided
Add new layer above, flood fill #f1904c
select word art layer,
select all, float, defloat, modify select expand 2, invert
back to orange layer & press delete. d/s
move orange layer below word art.
If this orange layer is too bright, lower opacity to your liking
Merge down wordart to orange layer.

8. Add copyright, URL, license & your watermark
and Name.
I added Kathy's name above the coffin.
Using point to point freehand selection, feather 0,
make selection around bottom of name & delete
to give impression name is sitting inside coffin. 

9.  Delete white background layer
Merge visible, crop merged opaque
and export as a PNG.

Hope you like your result. xo


Friday, January 15, 2021

My Sweet Valentine


In this PSP tutorial I used the beautiful artwork of Alicia Mujica
available for purchase at AliciaMujicaDesigns
Anyone wishing to use the same image in their own personal creation
MUST have the proper license for that image
PTU Scrapkit called Fall Blush by Kathy's PSP Designs
Thank you Kathy! ♥

Wednesday, December 23, 2020

Happiness Is


In this PSP tutorial I used the artwork of Alicia Mujica
available for purchase at AliciaMujicaDesigns
Anyone wishing to use the same image in their own personal creation
MUST have the proper license for that image
PTU Scrapkit called Wonderland by Kathy's PSP Designs
Thank you Kathy! ♥
Word Art by Myself found below
 Font: Happy Christmas

Thursday, December 17, 2020

Candy Cane

In this PSP tutorial I used the artwork of Alicia Mujica
available for purchase at AliciaMujicaDesigns
Anyone wishing to use the same images in their own personal creation
MUST have the proper license for that image
Plugin filter: Screenworks 
Font Paisley Calligraphy


Open New Image 700 x 700 px
Be sure the resolution is set to 72 px/inch & color depth 
is set to RBG 8 bits/channel - transparent checked. 
Flood fill white with flood fill tool
Open frame elem 38 C/P  lower 1/3 of image

Draw a rectangular selection around one window of the red frame
Open Paper 11 resize 75%, C/P below frame
Invert selection & delete. Do not deselect.
Open one of 3 images, resize 40%, C/P below frame
delete excess & repeat for other two windows.
When faces arranged, merge the 3 face images together
Duplicate - change blend mode to screen
Apply plugin Screenworks - gauze

Select red frame, apply D/S 10/10/50/5 black

Now decorate tag to make it unique:

 trees element 57 & 61 behind frame & papers
element 45 - 40%
element 49 - 50% & 75%
element 19 - 15%
element 18 - 15%, duplicate twice & resize each 75% & 85%
element 44 - 40%
element 42 - 30%
element 34 - full size
element 52 - 40%
element 40 - full size, place slightly to right
duplicate & mirror
move copy below original

Add D/S to elements except trees & frame

If you wish to resize tag, do so now before adding
copyright as resizing will distort the copyright.


Add copyright, license & url
Add name D/S


Close or delete white background layer
Merge visible, crop merged opaque
and save as a PNG.

Thank you for trying this quick tutorial!


Tuesday, December 8, 2020

Let It Snow


In this PSP tutorial I used the artwork of Alicia Mujica
available for purchase at AliciaMujicaDesigns
This tube is found in the Winter Special Edition 2018 pack 
Anyone wishing to use the same image in their own personal creation
MUST have the proper license for that image
PTU Scrapkit called Emelia Snow by Kathy's Psp Designs
Thank you Kathy! ♥
WordArt supplied HERE
Circular Snow Animation HERE
Mask 20/20 HERE
Animation Shop
Optional filter Eye Candy 5 Nature: Snowdrift 
Font KG A Little Swag

Saturday, November 14, 2020

Farmhouse Christmas


In this PSP tutorial I used the artwork of Alicia Mujica
available for purchase at AliciaMujicaDesigns
This tube is called Pink Elf 
Anyone wishing to use the same image in their own personal creation
MUST have the proper license for that image
FTU Scrapkit called Farmhouse Christmas by Kathy's Psp Designs
Thank you Kathy! ♥
Filter by Caroline & Sensibility - D Lines
If you don't have this filter, you may use Filter penta.com - jeans instead
Optional filter Eye Candy 5 Nature: Snowdrift 
Font Fluid Christmas


Open New Image 700 x 700 px
Be sure the resolution is set to 72 px/inch & color depth 
is set to RBG 8 bits/channel - transparent checked. 
Flood fill white with flood fill tool 
Add new raster layer - Select All
Open paper 14, copy
Paste 'into' the selection. Deselect
Open Element 51, C/P above Paper 14
Select All & invert selection
back to Paper layer, press delete on keyboard
Deselect & delete element 51.
Open element 50, resize width to 700 px
C/P


For this portion will be making our circular frame.

open element 96 resize 75%, all layers Unchecked
Select All, float selection, defloat
Add a new raster layer
Flood fill this layer with #5b0308
Deselect
We need to delete the area over the cluster ornament
so draw a rectangular selection (feather 0)
around this ornament on the red circle layer
& delete. 
Essentially this action removes the bottom right corner of the circle.
Duplicate this red circle & rotate copy 25-30 degrees to left.
Be sure the two red circles overlap each other to create full circle
merge the two red circles together.
Center the red circle over the black stripe element 96
then move this layer below element 96 in layers palette.
select element 96 with move tool, arranging it slightly downward & to right
off-centering it relation to the red circle with no gaps.
See preview below


When satisfied, merge the two layers together.
C/P & arrange as per reference tag.
Using magic wand, click inside circle frame
modify expand selection by 5 px
Add new raster layer
Open paper 15 and copy/paste 'into' the selection
Move paper layer below frame
Open Main tube resized 55%
C/P over paper layer but below frame
The selection should still be active
arrange tube to left of circle - Press delete on keyboard
to remove excess tube.
Deselect. Drop opacity to 65%
Duplicate tube layer
Apply filter Caroline & Sensibility D-Lines
setting 40/7
(or if unavailable, use penta.com - jeans)
Change blend mode to 'screen' 


Add element 57 resized 75%
C/P to right of frame, sharpen
Using pick tool (deformation) make tree slightly narrower
by moving the 'side' square markers inward


Open element 17, resize 75%
C/P on top of Red tree
image - flip horizontal (mirror), sharpen
duplicate 
on original white tree layer (bottom one) 
add light dropshadow eg. 1/1/35, blur 3 color black
Add element 86, resize 75% 
C/P to right of white xmas tree
duplicate poinsettia & mirror, placing to left 
of original poinsettia
Add element 72, resized 50%
Arrange to bottom left of frame, duplicate, flip horizontal (mirror)
and offset slightly
Add element 89 - 15%, place to bottom right, duplicate, mirror


Open element 27, resize 50%
C/P to right of image - flip horizontal (mirror in place)
Add element 88 - resize 30% C/P
Element 26 - 25% C/P
Element 69 - 30% C/P rotate 80 degrees to left
Arrange next to tree stomp


Add main tube resized to approx 28%
C/P
If using same tube, I darkened the overall color of the tube
using Adjust: brightness/contrast - Levels
Firstly duplicate main tube
on copy of tube layer
use brightness/contrast Levels
setting 67, 167, 255
This darkens all parts of the tube
which makes the face & skin a touch too dark.
Using eraser tool, size 100, hardness 50, density 100
dab the eraser tool over the face & skin areas 
to erase some of the dark skin tones.


Add drop shadows to all layers except
the white tree layers, bottom paper masked layer &
grunge brush layer (element 50)
Note: Main tube layer - always add the drop shadow
on its own layer by checking box 
'shadow on new layer' in drop shadow option box.
This allows you to use eraser tool to remove
any unwanted dropshadow eg. bottom of main tube
beneath snow portion


Play around by darkening some of the other elements
using the same brightness/contrast 'Levels' setting as above 
This gives the entire tag that crisp, balanced color tone
It's purely subjective though. 


If you wish to resize tag, do so now before adding
copyright as resizing will distort the copyright.


Add copyright, license & url
Add name. D/S
As an option, add EyeCandy 5 Nature - Snowdrift to your name
setting 'Small First Flakes'


To test overall placement of elements so none are cut-off,
add a new raster layer ABOVE the white background
Flood fill black or any dark color.
This will show if any of the white elements extend beyond the image


Close or delete white & black background layers.
Merge visible, crop merged opaque
and save as a PNG.


** It's a Wonderful Time of Year! **

Thursday, October 15, 2020

Spooky Halloween


In this PSP tutorial I used the artwork of Alicia Mujica
available for purchase at AliciaMujicaDesigns
Anyone wishing to use the same image in their own personal creation
MUST have the proper license for that image
FTU Scrapkit called 2018 Halloween Freebie by TinyTurtleDesigns
template 36 by Pink of JustLikeCandyDesigns
Mask 2c931711 HERE
I do not know the owner of this mask
Please notify me if it belongs to you.
WordArt Spooky by Pink of JustLikeCandyDesigns
Font Moonstone


Open template 36
delete CR & background doodle 
Add a new raster layer, Flood fill white
and send to bottom
Add new raster layer, flood fill #d34917
Open mask, minimize
apply mask to this orange layer, merge group.
Select right blue circle, select all, float, defloat
add new raster layer & paste paper 4 'into' the selection.
deselect.
Select left blue circle. Copy flower 22, resize 75%
and paste over top left blue circle, delete circle layer.
Select left checker sq, select all, float, defloat
add layer, C/P paper 14 'into' the selection, deselect.
Change blend mode to 'multiply'
Do same for right checker sq
Select left neon green circle, select all, float, defloat
Add new raster layer
C/P paper 6 'into' the selection. Deselect.
Select right neon green circle, select all, float, defloat
add new layer, paste paper 15 'into' the selection. Deselect.
Select purple center rect, select all, float, defloat,
paste paper 11 as new layer, selections invert, delete excess.
Change blend mode to 'multiply' and duplicate
Back to purple center rect, using adjust brightness/contrast
setting 255/0, changes purple to white
Select all, float, defloat, modify expand by 4 px,
add a new raster layer, flood fill black. Deselect
move this layer below white center rect.
Adjust, add noise, random, 55, monochrome UNchecked

Select black center square, open frame 16, C/P
move slightly downward
Using magic wand, click in center of this frame,
modify selection expand by 10, invert
back to black center square, delete excess black.


Add tube of choice, duplicate
move duplicate copy of tube below frame 
but above black center
using selection tool, draw a free hand selection
around bottom of tube to remove excess beyond outside of frame
Do this for both artist tube layers.
(you may use eraser tool instead to erase bottom of tube layers)


Add 'close-up' of tube inside frame for a mirrored effect.
Use magic wand to select inside frame,
Paste close-up, invert & delete excess tube.
Lower opacity of close-up to 32%,
duplicate and change blend mode to 'soft light' 


Add elements of choice or what I used:


2,3,4
23,24
30, 34, 37
41, 48,
63, 64, 65, 74 & 76
resize to your liking, sharpen once


Back to right blue circle paper 4 layer, 
select all, float, defloat, modify selection expand by 4
add a new raster layer,
flood fill with gold gradient (used metal brass, linear 45 angle)
comes with this version of PSP
Deselect 
Be sure this gradient layer is below the paper layer but above the
right blue circle layer.
On gradient layer, adjust, brightness/contrast - fill light/clarity
setting 48/17.


Add dropshadow to all circle layers, rectangle layer, frame & elements 
**Do not dropshadow elements 34 & 76**


Add wordart of choice, resize 50%, C/P & D/S
Add copyright, license & url
Add name in same colour as Masked layer #d34917
use favourite bevel setting & D/S
Close or delete white background layer.
Merge Visible, crop merged opaque
and save as a PNG.


I hope you enjoyed this tutorial