Showing posts with label steampunk. Show all posts

Sunday, October 1, 2023

FTU Steampunk Scrap kit ~ AI Generated


I am excited to share with everyone my first AI Generated scrap kit
for your personal use. It includes 55 elements, 5 frames & 10 Papers
Steampunk is a favorite theme of mine
& I hope you enjoy the elements in this kit as much as I enjoyed
making them.


Tuesday, September 26, 2023

CT Tag ~ Mechanical Steam

 *click on image to see full size*
Artist Tube ~ Very Many
available for purchase HERE
 AI Steampunk Scrapkit  ~ 'Mechanical Steam' available
Steam animation by Scrappy Bit of Fun


Love, love this Steampunk scrap kit which includes
90 Elements including one AI Generated Tube, 8 frames
and 16 papers. A unique steampunk kit for your collection.


Monday, August 28, 2023

CT Tag Delicate Steam


*click on image to see full size*
Artist Tube ~ Celinart Pinup available at 
Paper Dolls Scrap Store HERE
 Stunning Steampunk AI Scrapkit  ~ 'Delicate Steam' available


A favourite of mine is Pink and Black
and this kit won't disappoint you.
128 Elements including AI elements, 10 frames
and 20 papers. A must for your collection of steampunk scrapkits.


Sunday, October 23, 2022

Steampunk


Artist Tube by Very Many Steampunk 24 
PTU Scrap kit Manipulated by Magik
Thank you ♥ Magik ♥
Steampunkelement-003
 by IE Zombie
**To locate above element,
find Steampunk (36) ~ older entries, go back 14 pages**
Unfortunately the 'search' doesn't locate this element bg.
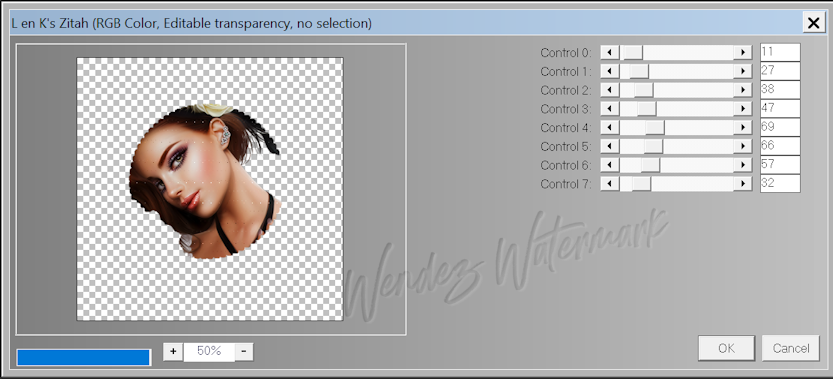
Plugin: L en K Land site of Wonders ~ Zitah
Font Antique Android

Let's go...

1. Open new transparent image 725 x 700 px
Flood Fill white
Open Steampunkelement-003 by IE Zombie
C/P  Resize 97%
C/P elem 64 D/S 1/1/55/3 blur colour black
Open Frame 2 C/P
Open elem 36 R/S 150% Sharpen
C/P
using magic wand, click inside of frame elem 2, expand by 5 px
select elem 36 layer, press delete
Merge down.
Add new RL, move below frame 2 and elem 36
Open paper 12, C/Paste into the selection. d/s
Duplicate ~ blend mode Multiply
Open close up of tube R/S 
C/P, invert selection
delete, d/s
Duplicate tube layer
on original, change hue/saturation to 0/0
on copy layer ~ duplicate ~ blend mode screem. 42% opacity
Apply L en K land site of wonders ~ Zitah
settings:

2. Add main tube of choice, R/S 43% C/P as uppermost layer
Note:  I recoloured skirt and hair.
Sharpen using unsharp mask ~ 1/50/1
luminance only checked
D/S

3.  Decorate your tag with elements of choice, D/S as you go:
2 ~ 30%
61 ~ 75%
9~ 75%
12 ~ 75%
30 ~ 50%, duplicate, arrange
31 ~ 25%
65 ~ 75%
56 ~ 25%
28 ~ 50%, duplicate R/S 75%
62 ~ 45%
21 ~ 25%
54 ~ 50% duplicate, merge down, sharpen twice D/S
13 ~ 75%, duplicate, mirror

4.  Resize image if you wish
Add copyright, URL, watermark & name
Delete white bg layer, merge visible, crop ~ merged opaque
and save as a PNG.

I hope you enjoyed this tutorial.
xo

Tuesday, June 8, 2021

SteamPunk Word Art


The above word art made by myself for a PSP Challenge at

Escape for Reality Forum

using a back-to-basics tutorial

Feel free to click on Word art

and right click to save.

Hope you find a use for it.

Here is an example of what I made with it


In this tag, I used the brilliant Steampunk kit by Dee

called Steampunk Mischief available for purchase

at her STORE 

and the gorgeous Steampunk 59 Tube by Very Many


Steampunk Fan


This tutorial was written May 8th, 2021 for those with moderate knowledge of PSP

The tutorial was written for Artistic Tag Passions Blog HERE

and includes a link to an amazing kit available in the Forum only.

I am using the Exclusive artwork of Alehandra Vanhek purchased at PFD  HERE

Exclusive kit called Artistic Automaton by PPP available at Artistic Tag Passions Forum HERE

Mask by Basima - 2021-03 Spring Mask 4 found on Creative Misfits Blog HERE

Plugins: Mura's Meister - Copies
         Toadies - What Are You

*Remember to sharpen elements as you resize: I use unsharp mask: 1/50/5 luminance checked*


Open your version of Corel PSP:
New image 675 x 675 px transparent.
Flood fill white
Elem #135 - 34% C/P
Apply Mura's Meister copies Plugin - Encircle - number 12, Shift X - 65, Shift Y - 66
Apply Toadie's What Are You? Plugin - change values to 10/10.


Add new raster layer, select all, copy Paper 34 & paste into the selecton. Cntl D to deselect.
Apply mask. Merge group.
Elem 171 - 75% C/P
Frame 11 - 57% C/P, D/S
Elem 64 - 75% C/P - duplicate, mirror, place side by side & merge down to each other.
Resize this 72% & place in the top half of the frame.
Elem 181 - 75% C/P, place slightly to left, duplicate & mirror

We will work with Elem 75 separately. 
Open elem 75, using selection tool - eclipse, feather 0, draw a selection inside this cameo frame
Selections - Edit - use 'Pick tool' to adjust size of the selection. 
Selections Edit again to exit. Press delete. Do not deselect.
open main tube C/P as new layer below frame, adjust and resize as desired, invert selection, delete, Cntl D. 

Duplicate tube, change blend mode to soft light, dec opacity to 69%, merge down.
Merge frame layer to tube layer. C/P on working image.


On working image, resize this cameo frame to your liking. Duplicate & close copy.

Elem 68 - 67% C/P, move down 

Main tube - 65% C/P sitting inside trunk. Erase or use freehand selection tool to delete part of tube.
*Tip: decrease opacity of main tube for precise placement, then draw selection or erase to rid of excess tube*
Duplicate tube - change blend mode to soft light and dec opacity to 62%. Merge down.
D/S both trunk & main tube.


Elem 143 - 50%, C/P to left atop black netting
duplicate, mirror, D/S
Elem 60 - R/S to 60 x 72 px, flip horizontal, D/S
Elem 67 - R/S to 98 x 202 px, D/S
Elem 62 - 35%, D/S
Elem 88 - R/S 196 x 141 px, C/P D/S
Elem 137 - 25%, duplicate, R/S 65% - D/S both
Elem 74 - 25% D/S
Elem 154 - 25%, rotate left 90 Deg.
Elem 28 - 25% D/S
Elem 180 - 50% D/S

Open copy of cameo frame we created earlier, R/S 50%, place as desired.

Add copyright, name & url. Delete white background and save as a PNG.
Hope you enjoy your result!

I also created an animated version using a steam animation by Simone HERE
and fan animation by myself  HERE

I hope you enjoy this tutorial!